|
|
|
||||||||||||
Lab Manual - Thoracic Wall, Pleura, & Pericardium |
|||||||||||||
Assignments:
- Before lab:
- Download and review the Lab Overview PowerPoint.
- Review the Prelab Learning Module.
- Review the Steps of Dissection and Dissection Videos.
- During lab:
- Follow the steps of the dissection procedure in the Lab Manual (this page).
- Be certain to identify all of the Review Items.
- After lab:
- Read the Dissector Answers to cover the Learning Objectives for this lab.
- Read the Clinical Case for this lab.
- Review the Practice Questions for this lab.
Learning Objectives:
Upon completion of this session, the student will be able to:
- Describe the framework of the thorax, including the sternum and its parts.
- Diagram a typical intercostal space, including muscles, nerves, and vessels.
- Describe the make up and surface projections of the pleural cavity. Identify its recesses.
- Distinguish between parietal and visceral pleura and between parietal and visceral pericardium. Identify the various divisions of the parietal pleura.
- Identify and describe the mediastinum, including its boundaries and subdivisions.
- Identify the contents of the anterior mediastinum.
- Describe the pericardium and its parts.
- Identify the sternocostal projections of the heart, in addition to its borders, surfaces, and sulci.
Procedure:
1. Review the osteology. (Play movie; View images: N 153, 154, 178, 185A, 185B, 186, 187, 191, TG 4-04A, 4-04B, 1-05A, 4-05B, 1-06, 4-09)
Consider the framework of the thorax. Examine the sternum and its parts (body, manubrium, xiphoid process). The sternal angle defines the position of the second rib. Examine thoracic vertebrae, their arrangement and relation to thoracic cavity. Examine ribs and determine parts of a typical rib (head, neck, tubercle, angle, and costal groove). The 1st, 11th and 12th ribs have anatomical features that distinguish them from a typical rib. Examine the attachments of ribs to vertebral bodies and transverse processes and (through costal cartilages) to the sternum. Consider changes in the shape of the rib cage during respiration. During inspiration the thorax inceases in its vertical, transverse and antero-posterior diameters. On yourself or partners, palpate and count ribs, costal margin, sternochondral junction, sternal angle, suprasternal (jugular) notch.
Chest laterally 2. Reflect the serratus anterior muscle. (Play movie; View images: N 189, TG 4-08)
Detach the serratus anterior muscle from its origin. In order to gain access to the thoracic cavity and examine the viscera, it is necessary to cut the clavicle, some ribs and pull forward the chest wall, as explained in the following directions.
3. Reflect the skin from the root of the neck upward as shown in Figure 3. (Play movie; View images: N 26, 28, TG 7-12, 7-16)
Starting inferiorly at the lower free edge of skin overlying the clavicle, reflect upward the skin and superficial fascia of the anterior part of the neck leaving the sternocleidomastoid and strap muscles in place. This flap will include a tissue-paper thin subcutaneous muscle, the platysma, which will be studied later with the neck region. The skin should be reflected to a line approximately midway between the jugular notch and the mandible (see Fig. 3).
4. Cut the sternocleidomastoid and detach the strap muscles from the manubrium. (Play movie; View images: N 27, 28, 29, 31, TG 7-12, 7-13, 7-16)
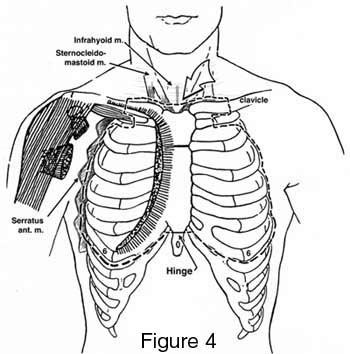
Cut the sternocleidomastoid muscle from its origins (manubrium and clavicle). Carefully detach the origins of the two strap (infrahyoid) muscles that attach to the deep surface of the manubrium by inserting a finger or two behind the manubrium as shown by the arrow in Figure 4.
5. Cut the clavicles and first ribs. (Play movie; View images: N 186, 189, 190, 419, TG 2-12, 4-07, 4-08)
Protect the deep structures above the clavicle and manubrium by depressing them and then cut through each clavicle with a small saw, just medial to the clavicular attachment of the trapezius muscle (see Fig. 4). Free the clavicles from their attachments to the first ribs by cutting the subclavius muscles and the costoclavicular ligaments. Depress the contents of the thoracic inlet to protect them from damage. Then free the manubrium from its attachment to the first rib by cutting (with chisel or bone cutter) through each first sternocostal junction close to the manubrium.
6. Cut intercostal muscles under rib 1. (Play movie; View images: N 33, 189, 190, 193, TG 4-08, 4-09)
Cut the intercostal muscles along the lower border of rib 1 as far as the angle of the rib.
7. Reflect the anterior chest wall as shown in Figures 4 & 5. (Play movie; View images: N 33, 189, 190, 193, TG 4-08, 4-09)
Cut through ribs 2, 3, 4, 5, and 6, approximately at the midaxillary line, but medial to any lateral cutaneous nerve branches that may be found. Cut intercostal muscles along the lower border of rib 6 as far as the sternum. Lift the clavicles and manubrium, and cut both internal thoracic arteries and veins as they pass deep to rib 1. DO NOT CUT the phrenic nerves. Turn down the rib cage (with attached clavicle, manubrium , and sternal body), "hinging" it by forcibly breaking ribs or cartilage; leave it as a cover for the thorax. Observe that the rib cage is lined with a serous membrane, the pleura, which is attached to its inner surface by connective tissue, the endothoracic fascia.
Figure 5
Internal thoracic arteries 8. Identify and remove the external intercostal muscles from two intercostal spaces and expose internal intercostal muscle. (Play movie; View images: N 33, 184, 189, 190, 191, 193, 211, 254, TG 4-08, 4-09, 4-10, 4-11, 4-18)
Clear fascia and connective tissue from the second intercostal space and study the three layers of intercostal muscles. Identify the external intercostal muscle (first layer) beginning at the mid-axillary line and tracing toward the sternum. Identify its external intercostal membrane anteriorly. Note again lateral and anterior cutaneous branches of intercostal nerves and accompanying vessels. Carefully remove the external intercostal muscle and membrane in two of the intercostal spaces to completely expose the internal intercostal muscle (second layer). Posteriorly, the muscle is replaced by the internal intercostal membrane, but this cannot be seen now. Deep to the internal intercostal muscle and membrane lie the intercostal arteries, veins and nerves. These neurovascular structures and the third layer of muscles are most easily demonstrated on the inner surface of the thoracic wall. The third layer of muscles consists of three separate parts, the innermost intercostal, the transversus thoracis and the subcostal muscles (the latter will be seen in the session on the posterior mediastinum). Dissect out an anterior and a posterior intercostal artery and vein and an intercostal nerve.
On the inner aspect of the reflected anterior chest wall, near its lateral, cut edges, identify the posterior intercostal artery and vein, and collateral branches. Identify the anterior intercostal arteries. Trace the intercostal nerve and its branches. The intercostal vein is the highest structure in the costal groove, then the artery and nerve (VAN). Observe the arterial supply to the periosteum of the rib. Identify the internal thoracic artery and vein, and its anterior intercostal branches (2 per space) for the first 5 or 6 intercostal spaces. Observe the transversus thoracis and innermost intercostal muscles on the deep surface of the reflected chest wall. Note specifically the relations of intercostal vessels and nerves to these muscles. Cut and reflect some of the transversus thoracis muscle to expose the internal thoracic artery, vein and parasternal lymph nodes. Note the bifurcation of the internal thoracic artery into the musculophrenic and superior epigastric arteries. Organize the innervation and blood supply of a complete intercostal space.
In the anterior mediastinum identify thymic fat; it is usually in the form of the original thymus gland. Trace thymic arteries and veins. Do you find any thymic nodules?
Remove the fat (gland), but leave the vessels.
9. Explore the pleura and its recesses. (Play movie; View images: N 194, 196, 197, 199, 206, 211, 230, 231, 232, 241, TG 4-15, 4-16, 4-17, 4-18, 4-20, 4-29, 4-31, 4-35, 4-36, 4-37)
Examine the parietal pleura and its relation to the chest wall. Identify cupula, the two pleural sacs, and the lateral surface of the lungs covered with visceral pleura. Define parietal and visceral pleura. Note the point of continuity between the two, the hilar reflection, at the hilum of the lung. Note the pulmonary ligament. The ligament is a double layer of pleura extending from the inferior end of the hilar reflection downward to the diaphragm below. Now, define costal, diaphragmatic and mediastinal parts of parietal pleura. Explore each pleural cavity by passing your hand around the lung. This maneuver can be done above the hilum, but not below it because of the presence of the pulmonary ligament. Do the same in a vertical direction. The left pleural sac is smaller than the right because of the location of the heart slightly to the left of midline.
Define and explore the costodiaphragmatic recess and costomediastinal recess. Realize that the costodiaphragmatic recess is the lowest extent of the pleural sac. The costomediastinal recess of both sides is disrupted during the reflection of the anterior chest wall, but examine its remnants. On the outer surface of the rib cage project and mark the various reflections of the costal pleura at the scapular, mid-axillary and mid-clavicular lines, in relation to overlying ribs and at the sternal border. Compare right and left sides. These points (lines) constitute the "lines of pleural reflection (parietal)" and are clinically significant. Without removing the parietal pleura, explore the mediastinal boundaries and list the major structures that lie within the mediastinum.
Collapsed lung Lung cancer 10. Open the pericardial sac and identify its features. (Play movie; View images: N 206, 208, 209, 211, 212, 226, 231, 232, 265, TG 4-18, 4-19, 4-29, 5-34, 4-35, 4-36, 4-36, 4-37, 4-37, 4-38, 4-45)
Find the phrenic nerves and pericardiacophrenic vessels embedded in the pericardial sac. Define the middle mediastinum. Identify that part of the pericardial sac not covered by pleura.
CT of the great vessels CT of the pulmonary veins 11. Examine the great vessels and gross features of the heart. (Play movie; View images: N 196, 206, 212, 214, 215, 231, 241, TG 4-15, 4-19, 4-22, 4-29, 4-35, 4-36)
Now relate all the great vessels (superior vena cava, pulmonary trunk and aorta) to one another and to the trachea.
CT of the trachea Observe the attachment of the pericardial sac to the diaphragm. Note the serous layer reflecting across the surface of the diaphragm. Review the total extent of the fibrous layer. Observe the serous layer; define its parietal and visceral (epicardium) parts. Note that the two become continuous (lines of reflection) at the great arteries (aorta and pulmonary trunk) and great veins (superior and inferior venae cavae; pulmonary veins). Explore the pericardial cavity. Insert your index finger behind the pulmonary trunk and ascending aorta, i.e., into the transverse pericardial sinus. Lift the apex of the heart and slip two or three fingers behind the heart into the oblique pericardial sinus. This sinus is formed by the reflection of the serous pericardium around the inferior vena cava and the right and left pulmonary veins.
Project the heart to the rib cage and sternum (sternocostal projection) and locate the apex and base of heart, superior and inferior venae cavae, aorta and pulmonary trunk.
Without removing the heart from the pericardial cavity identify: apex, base, right (acute) margin, left (obtuse) margin, diaphragmatic surface, atrioventricular (coronary) sulcus, anterior interventricular sulcus, right and left atria and corresponding auricles. Note relationship of the heart to the diaphragm, pleural cavities and posterior mediastinum.